mod_status is a useful Apache module that allows you to easily monitor Apache Server Performance using web-based dashboards that show live information and automatically update themselves. It parses Apache server logs to give you detailed information about connections, data transfer, and website speed. In this article, we will look at how to setup & configure mod_status to help you monitor Apache server performance.
What is mod_status
mod_status module analyzes Apache server logs to help you track key server metrics such as server uptime, server load, website traffic, incoming connections, cpu usage, and much more. Once you configure it, you can access all this information in a web-based live dashboard at a specific URL /server-status of your website.
How to Monitor Apache Server Performance with mod_status
Here are the steps to configure mod_status in Apache server.
1. Enable mod_status
By default, mod_status is already installed & enabled in Apache server. You can verify it with the following command.
$ ls /etc/apache2/mods-enabled
If you do not find mod_status in the list of displayed modules, then you can enable it with the following command.
$ sudo a2enmod status
2. Configure mod_status
Although mod_status is enabled in Apache, you need to make a few configuration changes to be able to access it. Open its configuration file in a text editor.
$ sudo vim /etc/apache2/mods-enabled/status.conf
Look for the line beginning with Require ip and set it to the IP you will be accessing it from. This will allow you to access server status only from this IP address. Here is an example.
<Location /server-status>
   ...
   Require ip 192.34.45.21
   ...
</Location>
Save and quit the file.
3. Restart Apache Server
Restart Apache server to apply changes.
$ sudo systemctl restart apache2
4. Test server status
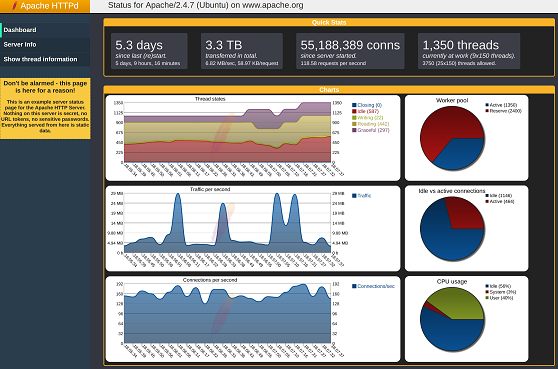
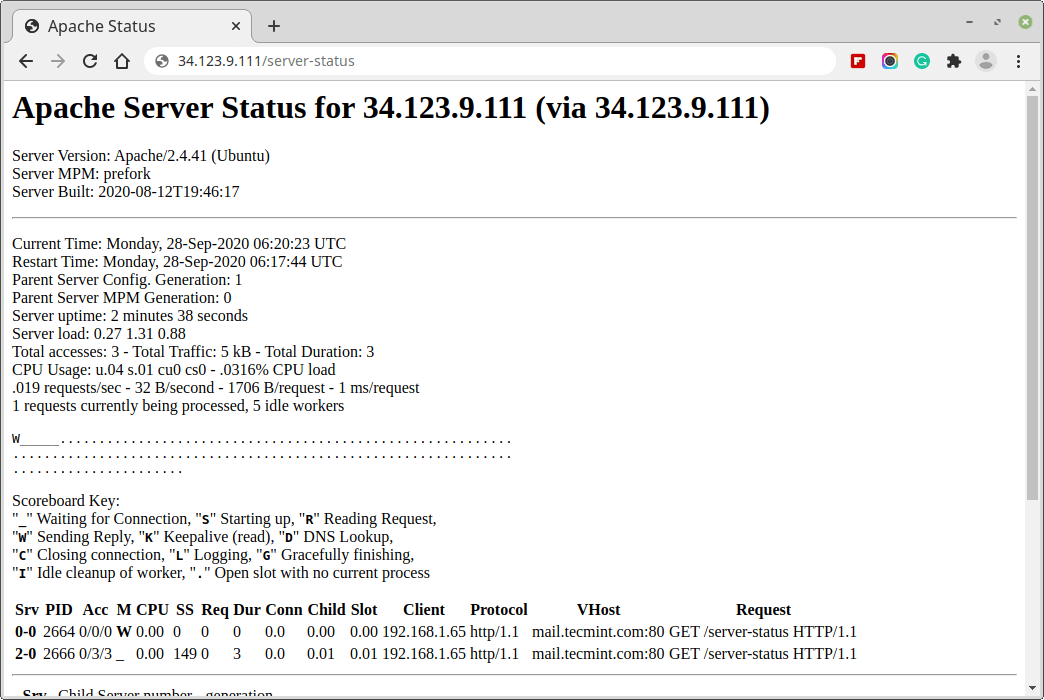
Open browser and go to http://your_domain_or_server_ip/server-status. Replace your_domain_or_server_ip with your website domain or server IP address. You will see the following web page that lists all the key stats and metrics about your website’s Apache server.
If you want this page to auto refresh, then add ?refresh=5 after the URL, to refresh every 5 seconds. If you want to refresh every 1 minute then add ?refresh=60 after the URL.
http://your_domain_or_server_ip/server-status?refresh=5
That’s it. Now you can regularly monitor Apache server performance from your web browser. Please note, if your IP address changes, then you will need to update the Require ip directive in status.conf file as shown in Step 2 above.
Also read:
How to Hide PHP Version in WordPress/Apache
How to Parse JSON in NodeJS
How to Prevent Direct Access to PHP File
How to Fix NGINX Upstream Timed Out Error
How to Setup SSL/HTTPS in NodeJS Server
Related posts:

Sreeram has more than 10 years of experience in web development, Python, Linux, SQL and database programming.