
Odoo is a popular ERP suite that provides many enterprise management applications such as website builders, CRM, etc. In this article, we will look at how to install Odoo with Apache Reverse Proxy. We will be using the Odoo community edition for our purpose.
Install Odoo with Apache Reverse Proxy
Here are the steps to install Apache server as reverse proxy for Odoo. Please note, you will need a Ubuntu system, a user with root or sudo privileges for these steps.
1. Update System
Log into your Linux/Ubuntu system via SSH, or open terminal and run the following command to update your system.
$ sudo apt update && apt upgrade
If you see any prompts during system update, enter y.
2. Install PostgreSQL Server
Odoo uses PostgreSQL server to store its information, so we will install PostgreSQL with the following command.
$ sudo apt install postgresql
After installation, PostgreSQL will start automatically, and also be enabled for auto-start on system reboot.
3. Install Odoo
There are two ways to install Odoo. We will look at both these methods.
Method 1
If you are performing a fresh installation of Odoo on your system, you can use these steps.
Since Odoo is not available in official Ubuntu Repository, we need to add its repository and download it using the following commands.
$ sudo wget -O - https://nightly.odoo.com/odoo.key | apt-key add -
$ sudo echo "deb http://nightly.odoo.com/12.0/nightly/deb/ ./" >> /etc/apt/sources.list.d/odoo.list
Next, update local package database.
$ sudo apt update
Install Odoo with the following command.
$ sudo apt install odoo
This command will automatically install/update python, create PostgreSQL user and create Odoo instance on your system.
After installation is complete, you can check Odoo’s status with the following command.
$ sudo systemctl status odoo
Method 2
If you want to maintain multiple Odoo versions on your system, or you already have Odoo installed on your system, you can follow these steps.
In this case, we install Odoo from its github repository using python virtual environment.
Run the following command to install pre-requisites.
$ sudo apt install build-essential wget git python3-pip python3-dev python3-venv python3-wheel python3-setuptools libxslt-dev libzip-dev libldap2-dev libsasl2-dev python3-setuptools node-less
Create a new system user with the following command.
$ sudo useradd -m -d /opt/odoo12 -U -r -s /bin/bash odoo12
Next, create a new PostrgeSQL user.
$ su - postgres -c "createuser -s odoo12"
In this case, we will also need to install Wkhtmltopdf to allow Odoo to export PDF reports. Since Odoo requires version Wkhtmltopdf 0.12 which is not available in Ubuntu repositories, you need to add the repository and then install it.
$ cd /opt
$ sudo wget https://builds.wkhtmltopdf.org/0.12.1.3/wkhtmltox_0.12.1.3-1~bionic_amd64.deb
$ sudo apt install /opt/wkhtmltox_0.12.1.3-1~bionic_amd64.deb
Next, install Odoo. First we switch to the newly created system user.
su - odoo12
Run the following command to clone Odoo’s git repository.
$ sudo git clone https://www.github.com/odoo/odoo --depth 1 --branch 12.0 /opt/odoo12/odoo
Let’s also create python virtual environment and activate it.
$ sudo python3 -m venv odoo-venv
$ sudo source odoo-venv/bin/activate
$ pip3 install wheel
$ pip3 install -r odoo/requirements.txt
(venv) $ deactivate && exit
Next, we create a configuration file for Odoo.
$ sudo cp /opt/odoo12/odoo/debian/odoo.conf /etc/odoo12.conf
Open configuration file with a text editor.
$ sudo vi /etc/odoo12.conf
Add the following lines. Replace admin123 with password of your choice.
[options]
; This is the password that allows database operations:
admin_passwd = admin123
db_host = False
db_port = False
db_user = odoo12
db_password = False
addons_path = /opt/odoo12/odoo/addons
xmlrpc_port = 8001
Save and close the file. Next, we create a system file to manage Odoo.
$ sudo vi /etc/systemd/system/odoo12.service
Add the following lines to it.
[Unit]
Description=Odoo12
Requires=postgresql.service
After=network.target postgresql.service

[Service]
Type=simple
SyslogIdentifier=odoo12
PermissionsStartOnly=true
User=odoo12
Group=odoo12
ExecStart=/opt/odoo12/odoo-venv/bin/python3 /opt/odoo12/odoo/odoo-bin -c /etc/odoo12.conf
StandardOutput=journal+console

[Install]
WantedBy=multi-user.target
Save and close the file. Restart Odoo to apply changes.
$ systemctl daemon-reload
$ systemctl start odoo12
4. Setup Apache as Reverse Proxy
Next, we install and enable Apache server with the following commands.
$ sudo apt install apache2
$ sudo systemctl enable apache2
You can verify that Apache server works, by opening web browser and visiting http://127.0.0.1. It will show you the message ‘It works!’
Next, run the following commands to install HTTP proxy module.
$ sudo a2enmod proxy
$ sudo a2enmod proxy_http
Now create a new virtual host file for your domain example.com.
$ sudo vi /etc/apache2/sites-available/example.com.conf
Add the following lines to it. Replace example.com with the your domain name.
<VirtualHost *:80>
ServerName example.com
ServerAlias www.example.com

ProxyRequests Off

Order deny,allow
Allow from all


ProxyPass / http://example.com:8069/
ProxyPassReverse / http://example.com:8069/

Order allow,deny
Allow from all
</VirtualHost>
Save and close the file. The above configuration makes Apache accept requests sent to domain example.com and send them to port 8069, the default port for Odoo.
Enable the virtual configuration file.
$ sudo a2ensite example.com
Restart Apache server to apply changes.
$ sudo service apache2 restart
Now when you open browser and visit http://example.com you will see the Odoo login screen.
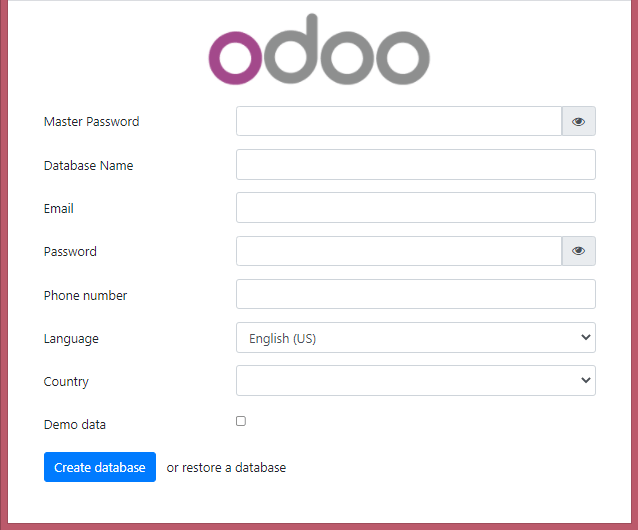
Enter the required details such as Odoo admin password, database name, etc. and proceed to start using Odoo.
In this article, we have learnt how to install and configure Apache reverse proxy for Odoo. If you want to run Odoo over HTTPS/SSL then just configure SSL certificate for your Apache server, as per the steps mentioned here.
Also read:
How to Setup PostfixAdmin in Ubuntu
How to Complete Uninstall PostgreSQL from Ubuntu
How to Setup NTP Server & Client in Ubuntu
How to Add User to Sudoers in Linux
How to Install Brotli for NGINX in Ubuntu