NGINX is a popular web server used as Http server, load balancer and reverse proxy. Django is a python-based framework to build websites, applications and blogs. In this article, we will look at how to use NGINX as reverse proxy for Django. It will help you use NGINX with Django to develop python applications and websites.
How to Use NGINX as Reverse Proxy for Django
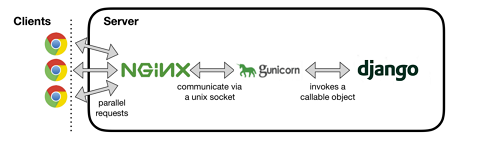
Here are the steps to use NGINX as reverse proxy for Django. You will need a python application interface such as uwsgi or gunicorn to run the Django application. Django will run at a port other than http port 80 since NGINX will be running on it. We will configure NGINX with Django in such as way that all static requests are directly served by NGINX while all dynamic requests sent to NGINX are forwarded to Gunicorn (Django).
Also read : How to Convert Int to String in Python
1. Set up Django App
It is assumed that your Django app is located at /home/ubuntu/myproject. You can change this path to that of your Django project everywhere below, as per your requirement. Open terminal and run the following command to open settings.py file for your Django app.
$ sudo vi /home/ubuntu/myproject/settings.py
Update the following lines as shown below. Update your_domain.com with your domain name.
DEBUG=False
ALLOWED_HOSTS = ['your_domain.com']
Save and close the file.
Collect your static files with the following command
$ cd /home/ubuntu/myproject
$ sudo python manage.py collectstatic
We also change owner of Django app folder to www-data so that NGINX can easily work with these files.
$ sudo chown -R www-data:www-data /home/ubuntu/myproject
Also read : How to Change Max File Upload Size in PHP
2. Install & Setup Gunicorn
Run the following command to install pip and Gunicorn.
python 2.x
$ sudo apt-get install python-pip
$ sudo pip install gunicorn
python 3.x
$ sudo apt-get install python-pip3
$ sudo pip3 install gunicorn
Open gunicorn configuration file.
$ sudo vi /etc/systemd/system/gunicorn.service
Add the following lines to it. Change /home/ubuntu/myproject with your Django project’s path.
[Unit]
Description=gunicorn daemon
After=network.target

[Service]
User=www-data
Group=www-data
WorkingDirectory=/home/ubuntu/myproject

ExecStart=/usr/bin/gunicorn --access-logfile - --workers 3 --bind

unix:/home/ubuntu/myproject/myproject.sock myproject.wsgi:application

[Install]
WantedBy=multi-user.target
Let us look at each of the sections above
- Unit – specifies metadata, dependencies and service name. Also tells init system to start service only after network target.
- Service – describes the file paths, users and owners who have the permissions to run the service. We give permission to ubuntu user and give ownership to www-data, the default owner for NGINX/Apache web service files.
- Install – tells systemd to start the service at boot after multi-user system is up & running.
Enable and start gunicorn
$ sudo systemctl start gunicorn
$ sudo systemctl enable gunicorn
Also read : How to Count Unique IPs and Requests Per IP in NGINX
3. Configure NGINX
Next, we configure NGINX to work with Django via Gunicorn.
Copy default server file to create one for your domain. Replace your_domain.com with your domain below.
$ sudo cp /etc/nginx/sites-available/default /etc/nginx/sites-available/your_domain.com.conf
$ sudo vi /etc/nginx/sites-available/your_domain.com.conf
Copy the following lines into this file. Replace your_domain.com with your domain and /home/ubuntu/myproject with the path to your Django project.
server {
    listen 80;
    server_name your_domain.com www.your_domain.com;

    # Serve static files
    location /static/ {
        root /home/ubuntu/myproject;
    }

    location / {
        include proxy_params;
        proxy_pass http://unix:/home/ubuntu/myproject/myproject.sock;
    }
}
As you can see above /static/ (root location for static files like css and js) are directly served by NGINX. On the other hand, all dynamic requests such as the one sent to / are forwarded to gunicorn with the help of proxy_pass function.
Also read : How to Configure Multiple Website in NGINX Server
Next, we enable this site by adding a symbolic link to /etc/nginx/sites-enabled which nginx read during startup.
sudo ln -s /etc/nginx/sites-available/your_domain.com /etc/nginx/sites-enabled/
Test NGINX configuration to ensure everything is all right.
$ sudo nginx -t
If you don’t any error messages, restart NGINX server to apply changes.
$ sudo systemctl restart nginx
4. Test your website
Just open your browser and go to http://your_domain.com and you should be able to see your Django project’s home page.
Also read : How to Use NGINX Reverse Proxy with NodeJS