vnstat is a popular network monitoring tool for Linux that keeps log of hourly, daily and monthly network traffic. It helps system & network administrators track the incoming and outgoing bandwidth for their networks. In this article, we will look at how to setup vnstat network monitoring tool in CentOS Linux. We will also look at how to plot its data on graph using PHP-based web interface.
How to Setup vnstat Network Monitoring Tool in Linux
Here are the steps to setup vnstat network monitoring tool in Linux.
1. Install rpmforge repository
Open terminal and run the following command depending on your system, to install rpmforge repository. Replace the version number of installed package as per your requirement.
CentOS/RHEL 6, 32 Bit (i686):
# rpm -Uvh http://packages.sw.be/rpmforge-release/rpmforge-release-0.5.2-2.el6.rf.i686.rpm

CentOS/RHEL 6, 64 Bit (x86_64):
# rpm -Uvh http://packages.sw.be/rpmforge-release/rpmforge-release-0.5.2-2.el6.rf.x86_64.rpm
2. Install vnstat using yum
Run the following command to install vnstat via yum command.
# yum install vnstat
3. Create database
vnstat stores all its data in a database. Run the following command to create a database for your network interface. Here is the command to create database for network interface eth0. You can change it as per your requirement.
# vnstat -u -i eth0
4. Schedule cronjob
vnstat uses cronjob to regularly log network traffic data into its database. Open /etc/cron.d/vnstat file in a text editor.
$ sudo vi /etc/cron.d/vnstat
Add the following lines to schedule a cronjob for vnstat to run vnstat every 5 minutes.
MAILTO=root
*/5 * * * * root /usr/sbin/vnstat.cron
Save and close the file to apply changes.
5. Configure Network Interface
By default, vnstat is configured to collect data about /etc/eth0 network interface. Open /etc/sysconfig/vnstat in text editor.
# sudo vi /etc/sysconfig/vnstat
Add the following line.
VNSTAT_OPTIONS="-i eth0"
Save and close the file.
6. View vnstat statistics via command line
Although we will create a graph for vnstat, you can view the same information via command line also. Here are some simple commands to retrieve common stats.
Show Statistics for Day
# vnstat -d
Show Statistics for Month
# vnstat -m
Show Statistics for Hour
# vnstat -h
Show Statistics in Real Time
# vnstat -l
The next part is optional, in case you want to view vnstat information on a graph.
Plot vnstat data on graph
vnstat provides a PHP-based web interface that allows you to view information on graphs. However, it requires Apache, PHP & php-gd packages. Here are the steps to plot vnstat information on graph.
1. Install Apache & PHP
Open terminal and run the following commands to install Apache & PHP 7.4.
# sudo apt update
# sudo apt upgrade
# sudo apt install apache2
# sudo apt install php7.4 php7.4-mysql php-common php7.4-cli php7.4-json php7.4-common php7.4-opcache libapache2-mod-php7.4
After PHP is installed, restart Apache server with the following command.
# sudo service apache2 restart
You can verify the installation of PHP & Apache with the following commands
# sudo systemctl status apache2
# sudo php --version
2. Download vnstat source archive
Run the following command to download vnstats front end’s source code.
# wget http://www.sqweek.com/sqweek/files/vnstat_php_frontend-1.5.1.tar.gz
3. Extract Archive
Extract the archive to /var/www/html/vnstat
# tar xzf vnstat_php_frontend-1.5.1.tar.gz
# mv vnstat_php_frontend-1.5.1 /var/www/html/vnstat
4. Edit Configuration File
Open config.php in /var/www/html/vnstat in a text editor.
# sudo vi /var/www/html/config.php
and add the following lines.
$language = 'en';
$iface_list = array('eth0', 'sixxs');
$iface_title['eth0'] = 'Public Interface';
$vnstat_bin = '/usr/bin/vnstat';
Save and close the file.
5. Test Installation
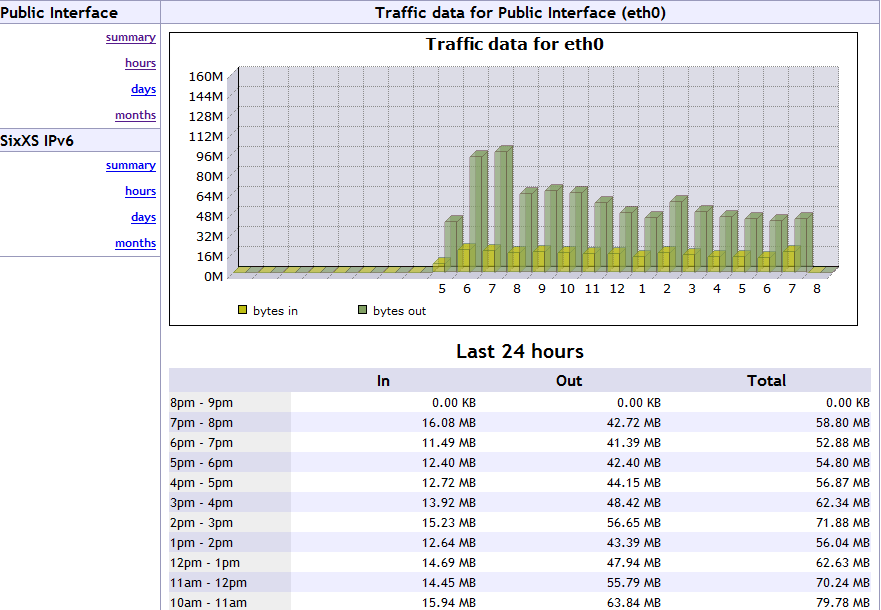
Open browser and go to the following URL to view vnstat graphs.
http://your_server_ip_or_domain/vnstat/
You will see a graph like the following image.
That’s it. In this article, we have learnt how to setup vnstat in Linux, and also configure its web-interface.
Also read:
How to Configure NFS Share in Ubuntu
How to Download Directory & Subdirectory using Wget
How to Backup & Restore Odoo Database
How to Configure Odoo with PyCharm
Install Odoo with Apache Reverse Proxy