
Monit is a powerful tool to monitor servers, processes, tasks, files & directories in Linux. It also allows you to automate tasks triggered by events such as high cpu usage, service not running, etc. In this article, we will look at how to install Monit in CentOS 7 Linux.
How to Install Monit on CentOS 7 Linux
Here are the steps to install Monit on CentOS 7 Linux. In case the following commands don’t work for you or you get “permission denied” error, please add sudo before every command below.
1. Install EPEL Repository
Open terminal and run the following command to install the EPEL repository containing Monit setup files.
$ yum install epel-release
$ yum update
2. Install Monit
Run the following command to install monit.
$ yum install monit
3. Enable & Start Monit
Enable monit to start automatically during system reboot. Also start it right now.
$ systemctl enable monit
$ systemctl start monit
4. Configure Monit
Open Monit’s configuration file in a text editor.
$ vi /etc/monitrc
Monit will frequently poll all the specified processes and documents in its configuration, to check their status. You can change the polling frequency by changing the following line set daemon. You may also instruct monit to start only after a certain time duration after system boot. In following example, we start monit 60 seconds after system boot.
set daemon 30
     with start delay 60
You may also specify mail server if you use one for emailing alerts
set mailserver mail.example.com port 25
You can also specify admin email address. Replace the email address below with your system administrator’s email address.
set alert admin@example.com
5. Add System Checks
Open monit.d/system file
$ vi /etc/monit.d/system
Now we will add some basic checks that will help you monitor system parameters such as cpu usage, memory usage, average load, etc.
Add the following lines to the above file.
## System
check system $HOST
  if loadavg (5min) > 3 then alert
  if loadavg (15min) > 1 then alert
  if memory usage > 80% for 4 cycles then alert
  if swap usage > 20% for 4 cycles then alert
  # Test the user part of CPU usage
  if cpu usage (user) > 80% for 2 cycles then alert
  # Test the system part of CPU usage
  if cpu usage (system) > 20% for 2 cycles then alert
  # Test the i/o wait part of CPU usage
  if cpu usage (wait) > 80% for 2 cycles then alert
  # Test CPU usage including user, system and wait. Note that
  # multi-core systems can generate 100% per core
  # so total CPU usage can be more than 100%
  if cpu usage > 200% for 4 cycles then alert

## Network
check network eth0 with interface eth0
  start program = "/sbin/ifup eth0"
  stop program = "/sbin/ifdown eth0"
  if failed link then restart
  if failed link then alert
  if changed link then alert
Restart Monit service.
$ systemctl restart monit
If you want more Monit configuration examples check this link.
Please note, every time you restart monit you will have to wait 60 seconds as we have set it above in step 4, for “Start with delay” parameter. Otherwise, you will get a connection refused error.
Next, you can run the following command to ping monit and get system status.
$ curl -v http://admin:monit@localhost:2812
That’s it. Monit is installed and setup for your system. Next steps are optional in case you want to be able to access Monit web page via NGINX server.
6. NGINX configuration (optional)
Open terminal and create NGINX configuration file for monit.
$ vi /etc/nginx/sites-available/admin/monit.yoursite.com.conf
Add the following lines to it.
server {
  listen 80;
  server_name monit.yoursite.com;

  location / {
    proxy_pass http://localhost:2812;
  }
}
In the above code, we have created a simple NGINX server that listens to port 80 with URL monit.yoursite.com and passes any incoming requests to port 2812 on the same machine as Monit service runs on port 2812. So basically NGINX passes all incoming requests to Monit server.
Restart NGINX server to apply changes.
$ systemctl restart nginx
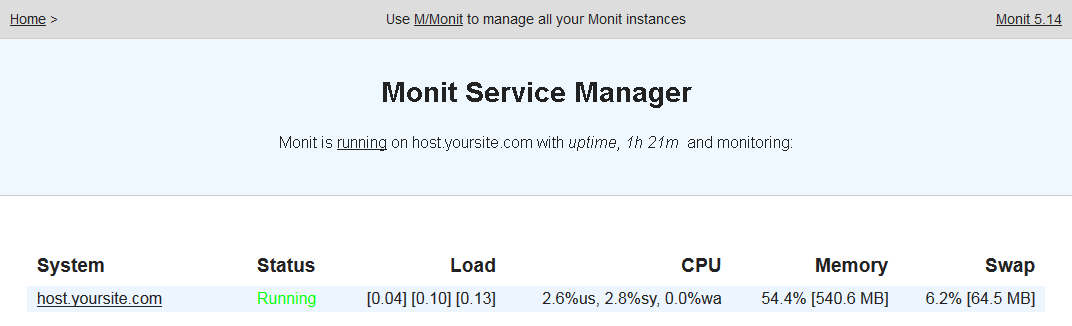
Open browser and go to http://monit.yoursite.com and you will see the following web-based admin page for your Monit service.
In this article, we have learnt how to install & configure Monit service in CentOS Linux. You can also use these steps for Redhat & Fedora Linux.
Also read:
How to Install mod_wsgi in Apache
How to Install Memcached in Ubuntu
NGINX Block URL Access
How to Resize Linux Partition without Data Loss
How to List Directories & Subdirectories in Linux