
Elasticsearch allows you to perform real-time, full-text searches on large datasets. It enables you to embed search functionality in your applications that use large amount of data. In this article, we will look at how to install & configure Elasticsearch in Ubuntu.
How to Install & Configure Elasticsearch in Ubuntu
Here are the steps to install & configure Elasticsearch in Ubuntu. For these steps, you need to be logged in as root, or as user with sudo privileges.
1. Install Necessary Dependencies
Elasticsearch runs on Java. Open terminal and run the following command to check if Java is installed.
$ java -version
The output of above command must display Java version on your system. If it says command not found, then run the following command to install JDK (Java Development Kit) on your system.
$ sudo apt update
$ sudo apt install openjdk-8-jdk
We also need to install the following package to allow repository access via HTTPS.
$ sudo apt install apt-transport-https
2. Add Elasticsearch Repository
Run the following command to get GPG key for Elasticsearch Repository.
$ sudo wget -qO - https://artifacts.elastic.co/GPG-KEY-elasticsearch | sudo apt-key add -
If everything went well, it will display OK as output.
Run the following command to add the repository to your system.
$ echo "deb https://artifacts.elastic.co/packages/7.x/apt stable main" | sudo tee -a /etc/apt/sources.list.d/elastic-7.x.list
3. Install Elasticsearch
Run the following command to update system.
$ sudo apt update
Run the following command to install Elasticsearch.
$ sudo apt install elasticsearch
4. Start Elasticsearch
Run the following commands to reload systemd configuration.
$ sudo systemctl daemon-reload
The following command enabled Elasticsearch to autostart during boot.
$ sudo systemctl enable elasticsearch.service
Start Elasticsearch with the following command.
$ sudo systemctl start elasticsearch.service
Here are some additional commands for elasticsearch. Stop Elasticsearch
$ sudo systemctl stop elasticsearch.service
Restart Elasticsearch
$ sudo systemctl restart elasticsearch.service
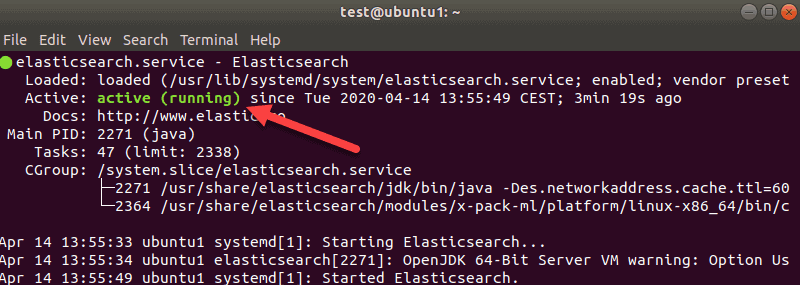
Check Elasticsearch status
$ sudo systemctl restart elasticsearch.service
If Elasticsearch is running, you will see the following output.
5. Configure Elasticsearch
By default, Elasticsearch is already configured to work on local machines, with single nodes. If you run multi-node cluster then you may need to change its configuration file located at /etc/elasticsearch/elasticsearch.yml. Similarly, its logging configuration file is located at /var/log/elasticsearch/logging.yml.
By default, Elasticsearch allows only local access. If you want to allow remote access, you need to allow access to port 9200 & 9300 in your firewall, and update the configuration file to enable remote access.
Open Elasticsearch configuration file.
$ sudo vim /etc/elasticsearch/elasticsearch.yml
Scroll down to Network section. Remove # in front of network.host and add 0.0.0.0.
network.host 0.0.0.0
Also add these lines.
transport.host: localhost

transport.tcp.port: 9300

http.port: 9200
Save and exit the file.
6. Test Elasticsearch
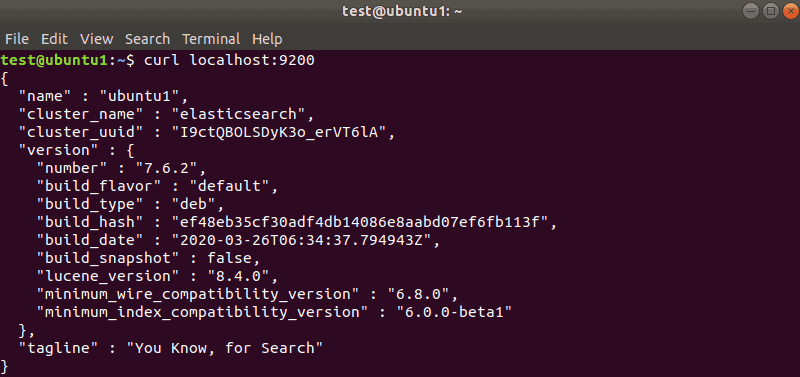
Elasticsearch listens to port 9200. You can easily test it using curl command.
$ curl localhost:9200
You will see output similar to the one below.
In this article, we have looked at how to install & configure Elasticsearch.
Also read:
How to Clear Cache Memory in Linux
How to Compare Two Directories in Linux
How to Find Files Larger Than 1GB
How to Compare Two Files in Linux
How to Use Strace Command in Linux