Apache Tomcat is a popular application container for Java-based applications. It works well as a standalone server as well as with popular proxy servers like NGINX. It is one of the most widely used server for Java applications, with support for servlets as well as Java Server Pages (JSP). In this article, we will look at how to install Apache Tomcat with NGINX on Debian Linux. You can use these steps with other Debian systems such as Ubuntu also. In our setup, all requests will be received by NGINX proxy server and forwarded to Apache Tomcat.
How to Install Apache Tomcat with Nginx Proxy on Debian Linux
Here are the steps to install Apache Tomcat server with NGINX reverse proxy.
1. Update System
Open terminal and run the following command to update your Debian system.
$ sudo apt-get update -y
2. Install Java
Run the following command to install Java.
$ sudo apt-get install default-jdk -y
3. Install Tomcat
We first create a separate Linux user for tomcat server.
$ sudo useradd -m -U -d /opt/tomcat -s /bin/false tomcat
Then download Tomcat installation file. You can update the Tomcat version as per your requirement. Here is the list of all available versions.
$ sudo wget https://www-eu.apache.org/dist/tomcat/tomcat-9/v9.0.45/bin/apache-tomcat-9.0.45.tar.gz
Extract the downloaded file.
$ sudo tar -xvzf apache-tomcat-9.0.45.tar.gz
Move the extracted file to /opt with following command.
$ sudo mv apache-tomcat-9.0.45 /opt/tomcat/tomcat
Set proper permission & file ownership.
$ sudo chown -R tomcat:tomcat /opt/tomcat/tomcat
$ sudo chmod -R 755 /opt/tomcat/tomcat
4. Configure Tomcat Service
Create systemd file for Apache Tomcat with the following command.
$ sudo vi /etc/systemd/system/tomcat.service
Add the following lines to this file.
[Unit]
Description=Tomcat 9.0 servlet container
After=network.target

[Service]
Type=forking

User=tomcat
Group=tomcat

Environment="JAVA_HOME=/usr/lib/jvm/default-java"
Environment="JAVA_OPTS=-Djava.security.egd=file:///dev/urandom"

Environment="CATALINA_BASE=/opt/tomcat/tomcat"
Environment="CATALINA_HOME=/opt/tomcat/tomcat"
Environment="CATALINA_PID=/opt/tomcat/tomcat/temp/tomcat.pid"
Environment="CATALINA_OPTS=-Xms512M -Xmx1024M -server -XX:+UseParallelGC"

ExecStart=/opt/tomcat/tomcat/bin/startup.sh
ExecStop=/opt/tomcat/tomcat/bin/shutdown.sh

[Install]
WantedBy=multi-user.target
Save and close the file. Run the following command to reload system daemon.
$ sudo systemctl daemon-reload
Start Tomact service and enable it to run at system reboot.
$ sudo systemctl start tomcat
$ sudo systemctl enable tomcat
5. Configure Tomcat Web Interface
Tomcat Web Interface is the admin panel that allows you to manage your server. You will need to create a user to be able to log into its dashboard.
You can define it using tomcat-users.xml file.
$ sudo vi /opt/tomcat/tomcat/conf/tomcat-users.xml
Find the following section and modify the following lines. Update admin and password in bold below as per your requirement.
<role rolename="admin-gui"/>
<role rolename="manager-gui"/>
<user username="admin" password="password" roles="admin-gui,manager-gui"/>
Save and close the file.
By default, this web interface is accessible only from localhost. We need to make it accessible from outside.
Open following file in a text editor, for Manager app.
$ sudo vi /opt/tomcat/tomcat/webapps/manager/META-INF/context.xml
Remove the following line.
<Valve className="org.apache.catalina.valves.RemoteAddrValve" allow="127\.\d+\.\d+\.\d+|::1|0:0:0:0:0:0:0:1" />
Save and close the file. Similarly, open the following file for Host Manager App and remove the above line.
$ sudo vi /opt/tomcat/tomcat/webapps/host-manager/META-INF/context.xml
Save and close the file.
Restart Apache Tomcat server.
$ sudo systemctl restart tomcat
6. Install & Configure NGINX
Run the following command to install NGINX.
$ sudo apt-get install nginx -y
Create a separate virtual host configuration file.
$ sudo vi /etc/nginx/conf.d/tomcat.conf
Add the following lines. Replace tomcat.example.com with the URL of your website/application.
server {
  listen          80;
  server_name     tomcat.example.com;
  root            /opt/tomcat/tomcat/webapps/;


  location / {
        proxy_set_header X-Forwarded-Host $host;
        proxy_set_header X-Forwarded-Server $host;
        proxy_set_header X-Forwarded-For $proxy_add_x_forwarded_for;
        proxy_pass http://127.0.0.1:8080/;
  }
}
In the above code, we create a NGINX server that runs on port 80. We use proxy_pass directive to pass all incoming requests to port 8080 used by Apache Tomcat. This way our NGINX & Tomcat servers communicate with each other.
Test NGINX server configuration for errors.
$ sudo nginx -t
If you don’t get any errors, restart NGINX server with the following commands.
$ sudo systemctl restart nginx
7. Test Apache Tomcat Web UI
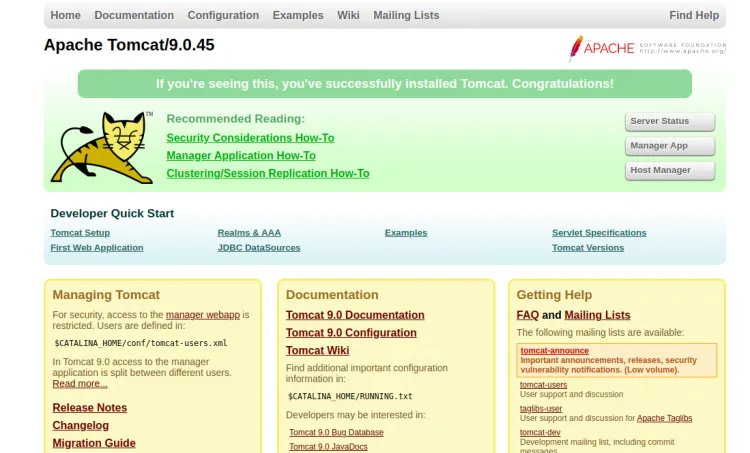
Open browser and visit http://tomcat.example.com. You will see the following screen.

Click on Manager App or Host Manager at the top right corner of your screen. You will see a login prompt for username & password. After successful sign on, you will be taken to the respective app’s home page.
That’s it. In this article, we have learnt how to install Tomcat with NGINX on Debian Linux.
Also read:
How to Install OpenOffice in Ubuntu
How to Install KeepAlived in CentOS
How to Find Hardware Details in Ubuntu
How to Install Ghost Blog with NGINX in Ubuntu
How to Save Grep Output to File
