Full Disk Encryption is a great feature available in Ubuntu that allows you to protect your disks and secure your data. Once you enable full disk encryption in Ubuntu, then onwards whenever you boot your system, you need to enter a password in order to be able to mount all disks on your device. If you enter the wrong password, it simply won’t boot your system. In case your device is stolen others will not be able to boot your device, without knowing the password. Even if they extract the contents of your disk through other means, all files will be encrypted and others will not be able to access it.
However, it must be enabled at Ubuntu installation. If you have already installed Ubuntu, then you will need to reinstall it. Full Disk Encryption also covers swap space and boot partition. Nevertheless, you can always encrypt individual disk partitions, which can be done even after installing Ubuntu. In this article, we will learn how to enable full disk encryption in Ubuntu.
How to Enable Full Disk Encryption in Ubuntu
Here are the steps to enable full disk encryption in Ubuntu. During Ubuntu Installation, you just need to select a few additional options to enable full disk encryption.
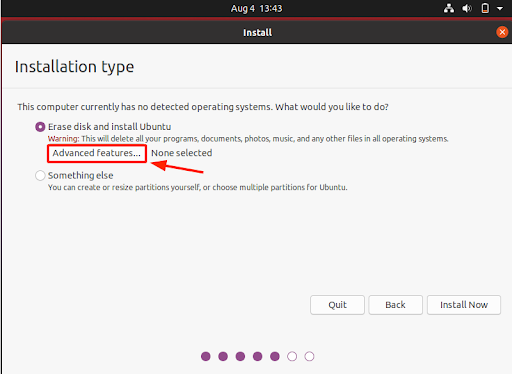
1. Select Installation Type
Go through the steps of Ubuntu installation as usual. When you come across the screen for ‘Installation type’, select ‘Advanced Features’.
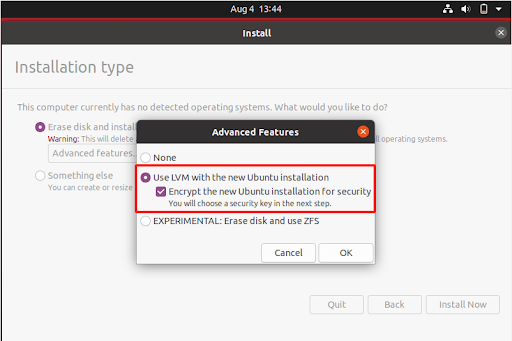
2. Use LVM
On the next window, select both the options for “Use LVM with the new Ubuntu installation” and “Encrypt the new Ubuntu installation for security.” This will secure your system with LUKS encryption. Click Ok to save changes.
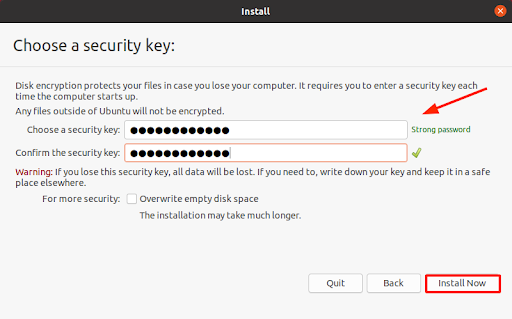
3. Enter Security Key
Enter the password you want for disk encryption. Use a strong password to secure your data. Then click ‘Install Now’. You also have the option of creating a recovery file which can be used to unlock your system in case you lose your password.
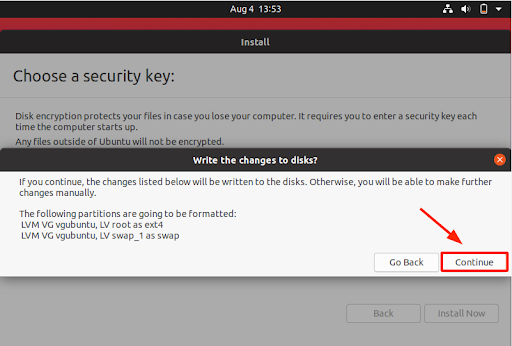
You may see some prompts, click Continue for each one.
4. Complete Installation
Now just go through the rest of the steps of Ubuntu installation as usual.
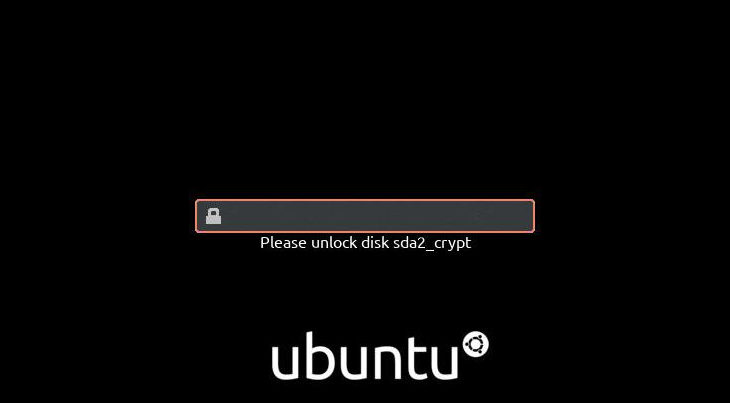
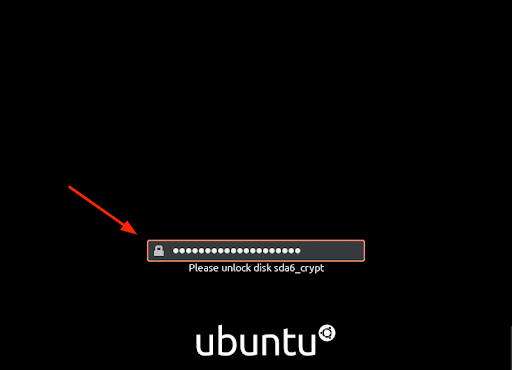
Once the installation is complete, click ‘Restart Now’ to reboot your system, you will be asked to enter password to mount and decrypt your disks. If you enter the wrong password, you will not be able to boot your system.
In this article, we have learnt how to enable full disk encryption in Ubuntu. You just need to select a couple of options during the normal installation steps, that’s all. And remember to use a strong password and save it for future reference. Also please note, you are asked for a password only on boot. So if your system is on when it is stolen, others will not be asked for this password to boot into your system.
Also read:
How to Insert Item Into JS Array At Specific Index
How to Find Files Larger Than 100Mb in Linux
How to Undo & Redo in Nano Editor
How to Undo & Redo in Vim/Vi Editor
How to Set Timeout in cURL