Every Linux system that has desktop, has a display manager that handles user authentication and rendering desktop environment. When you boot Linux, the display manager will show a login screen. On successful authentication, it loads the desktop environment of that user. It also controls user session. It basically handles the entire GUI unless the graphic is provided by hardware acceleration. Some of the popular display manager systems are gdm3, lightdm and sddm. gdm3 is the default display manager for gnome desktops and sddm is the desktop manager for KDE desktops. There are also display managers like lightdm that work on both Gnome as well as KDE desktops. Sometimes you may need to change default display manager in Ubuntu. Here are the steps to do it.
How to Change Default Display Manager in Ubuntu
Here are the steps to change default display manager in Ubuntu. We will install and enable lightdm display manager for our purpose. Before we proceed, please make sure that you have enabled SSH on your system and have an SSH server running on it. This is because, in case there are any issues in changing default display manager, you should be able to access your system via SSH, till the issue is resolved.
1. Check Current Display Manager
Open terminal and run the following command to check current display manager.
$ cat /etc/X11/default-display-manager
/usr/sbin/gdm3
2. Installing Required Display Manager
LightDM is a popular feature-rich display manager that works on different desktop technologies. It is light-weight and faster than gdm3. Run the following command to install lightdm on Ubuntu.
$ sudo apt update
$ sudo apt install lightdm
3. Change Default Display Manager
Once lightdm is installed, you can change the default display manager using the following command.
$ sudo dpkg-reconfigure gdm3
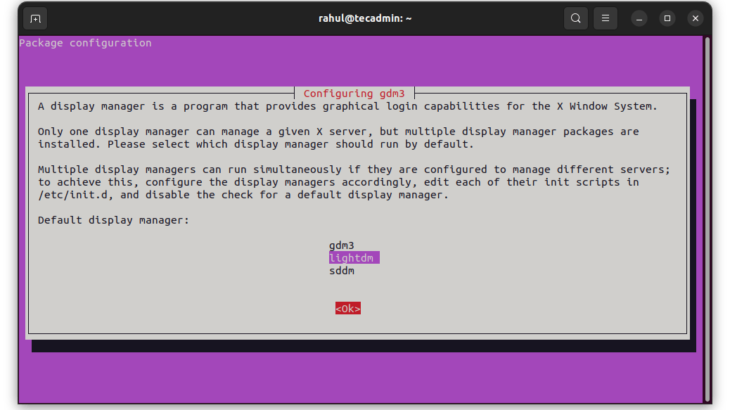
On running the above command, you will see a screen that lists all available display managers installed on your Linux system.
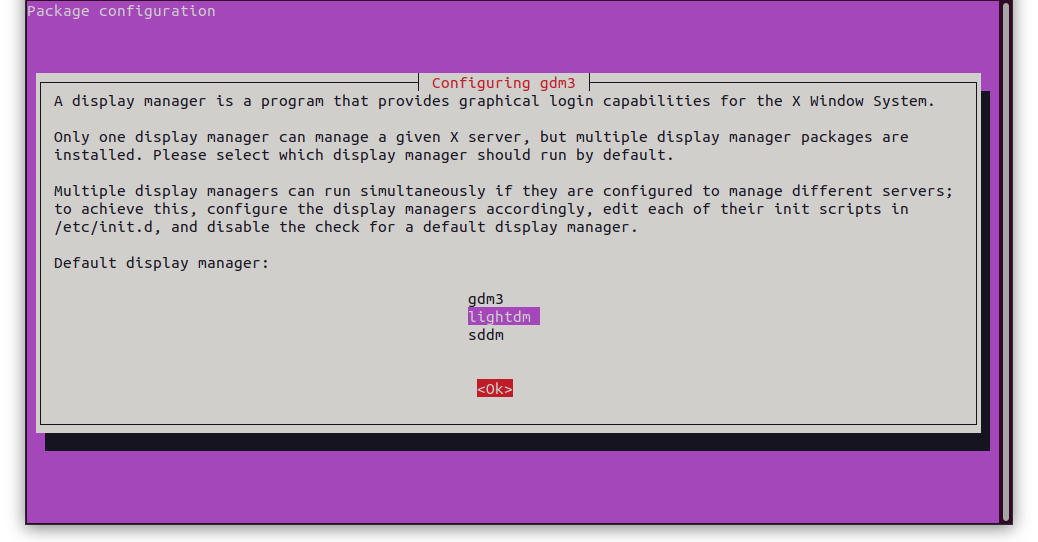
You will need to select the display manager of your choice using up/down arrow keys. Press Tab key to take control to the ‘Ok’ button at the bottom of the screen, and hit Enter key.
4. Verify Changes
Once you have changed your display manager, you can confirm changes with the following command.
$ cat /etc/X11/default-display-manager

/usr/sbin/lightdm
Reboot your system to load desktop with newly configured display manager.
5. Revert All Changes
You can revert the above changes with the following command.
$ sudo dpkg-reconfigure gdm3
Again you will see a screen with a list of available display managers. Select the display manager of your choice using up/down arrow keys and select Ok option to save changes.
In this article, we have learnt how to change display manager in Ubuntu. Please note, by default, there is at least one display manager installed on your system, whenever you install a desktop-based Linux on your machine.
Also read:
How to Fix “Please Install All Available Updates before Upgrading”
How to Change Login Screen Background in Ubuntu
Most Common Fdisk Commands in Linux
How to Convert Home Directory Into Partition in Linux
How to Check Remote Port is Open in Linux